
(이때까지 잘 되던 프로젝트에 babel.config.js의 @babel/preset-env가 에러를 내고있습니다. can't find variable에러가 뜰경우
해당 presets인 @babel/preset-env을 삭제하고, npm start -- --reset-cache를 실행하여 캐시 삭제 후 npm run ios를
실행하여 확인해보시기 바랍니다! 이 에러 및 자잘한 에러에 대해서 글을 작성 중입니다.)
1. Typescript 적용하기
이제는 필수가 된 Typescript를 적용해보도록 하겠습니다.
설치해야할 npm이 많지만 한번에 설치하면 왜 설치하는지 모르고 지나칠수 있으니 하나하나 순서대로 설치하겠습니다.
1-1. typescript 컴파일을 위한 typescript와 @babel/preset-typescript를 설치합니다.
npm install --save-dev typescript @babel/preset-typescript1-2. typescript 확장자는 ts, tsx이므로 webpack의 설정을 변경해줍니다.
resolve: {
    extensions: ['.ts', '.tsx', '.js', '.json'],
    alias: {
      'react-native$': 'react-native-web',
    },
  },
  module: {
    rules: [
      {
        test: /\.(t|j)sx?$/,
        exclude: /node_modules\/(?!()\/).*/,
        use: {
          loader: 'babel-loader',
        },
      },
    ],
  },
js, jsx, ts, tsx 모두를 포괄하는 정규식과 extensions을 추가해줍니다.
1-3. babel.config.js 변경
module.exports = {
  presets: [
    'module:metro-react-native-babel-preset',
    '@babel/preset-react',
    '@babel/preset-typescript',
  ],
};
위와같이 변경해줍니다.
1-4. tsx 파일을 만들어 작동하는지 확인
루트에 components라는 폴더를 만들고 TextItem.tsx라는 파일을 생성합니다.
import React,  { FC } from "react";
import { Text } from 'react-native';

interface Props {
  text: string
}
const TextItem: FC<Props> = ({text}) => {
  return <Text>{text}</Text>
}

export default TextItem
위와같이 작성하고
App.js를 App.tsx로 변경하고,
import React from 'react';
import {View, StyleSheet} from 'react-native';
import TextItem from './components/TextItem';

function App() {
  return (
    <View style={styles.container}>
      <TextItem text="Hello world from React Naitve Web" />
    </View>
  );
}
const styles = StyleSheet.create({
  container: {
    flex: 1,
    justifyContent: 'center',
    alignItems: 'center',
  },
});

export default App;
위와같이 수정한다음
npm run start-react를 시작해서 정상적으로 동작하면 Typescript 컴파일은 정상적으로 동작하는것입니다.
2. Typescript를 위한 type error 적용
typescript가 제대로 컴파일된다해도 이 상태로는 Typescript를 제대로 쓰고있다고 할 수 없습니다.
TextItem.tsx의 interface 부분을
interface Props {
  text: number
}
이렇게 수정해면 App.tsx에서는
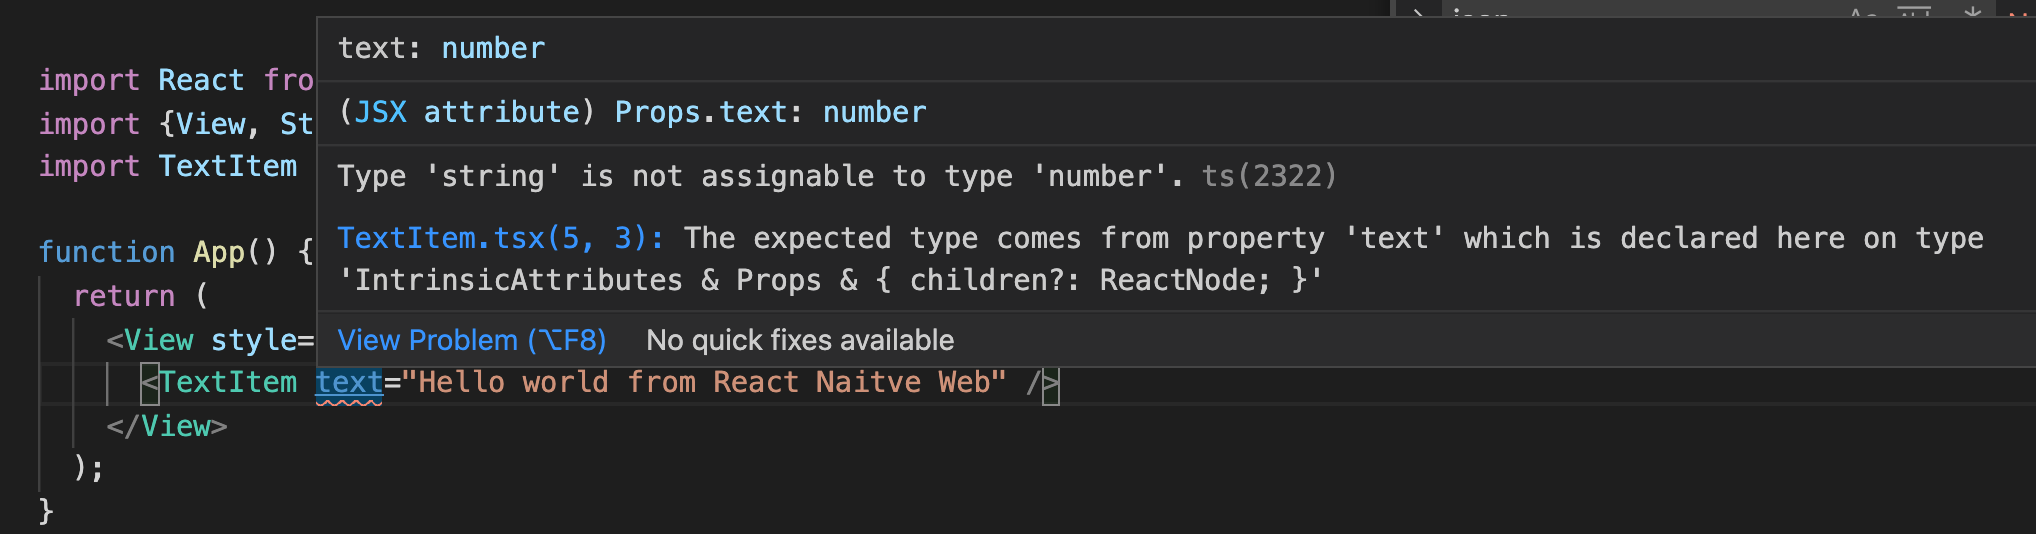
이렇게 빨간줄만 그어지는 경고가 표시될뿐 컴파일은 정상적으로 진행됩니다.
그럼 typescript의 오류가 있을때 컴파일시 에러를 노출해보도록 하겠습니다.
2-1. tsconfig.json 적용
루트에 tsconfig.json 파일을 만들고
{
  "compilerOptions": {
    "target": "es6",
    "module": "commonjs",
    "jsx": "preserve",
    "strict": true,
    "baseUrl": "./",
    "esModuleInterop": true,
    "forceConsistentCasingInFileNames": true
  }
}
위와 같이 수정후 저장합니다.
*기본적인 config옵션만 사용한것으로 www.typescriptlang.org/tsconfig를 참고하여 자신에 맞게 사용하세요.
2-2. ForkTsCheckerWebpackPlugin 설치
npm install save-dev fork-ts-checker-webpack-plugin위의 npm을 설치하고 webpack.config.js에서
const ForkTsCheckerWebpackPlugin = require("fork-ts-checker-webpack-plugin");

....
plugins: [HTMLWebpackPluginConfig, new ForkTsCheckerWebpackPlugin()],
  devServer: {
    host: '0.0.0.0',
    open: true,
    historyApiFallback: true,
    contentBase: './',
    hot: true,
  },
상단에 설치한 npm을 불러오고 plugins에서 추가해줍니다.
그 다음
npm run start-react을 실행하면 컴파일에서 에러가 나고, 화면은 정상적으로 노출됩니다.
2-3. 에러 해결
대부분의 에러는 import하는 npm들의 type이 정해져있지 않기 때문입니다. 아래의 명령어를 실행합니다.
npm install --save-dev @types/react @types/react-dom @types/react-native*typscirpt를 사용하면 단순히 npm만 설치해서 Import해서 사용하면 type이 선언되어있지않은 경우가 대부분이라
@type/모듈명 으로 설치하거나 직접 작성해야합니다
그럼 남은 에러는 전에 변경한 TextItem.tsx의 interface부분인데, 이 부분을
interface Props {
  text: string
}
으로 다시 변경해줍니다.
그럼 에러가 해결되고 typescript를 사용할 준비가 되었습니다.
혹시나 에러가 나거나하신다면
github.com/kimik-hyum/react-native-web/tree/typescript를 참고해주세요!
'Front-End' 카테고리의 다른 글
| [React Native Web] 에러 정리 (7) | 2021.06.01 |
|---|---|
| [React Native Web] 앱과 웹을 한번에 개발하기 - 4(feat.Styled-Components) (4) | 2021.05.09 |
| [React Native Web] 앱과 웹을 한번에 개발하기 - 2 (3) | 2021.02.08 |
| [React Native Web] 앱과 웹을 한번에 개발하기 - 1 (19) | 2021.02.07 |
| [git] git 기초 커맨드 (0) | 2020.08.02 |


댓글